SonarQube Scanner is a default launcher to analyze projects with SonarQube. Both SonarQube and Sonar-Scanner were developed by sonarsource
PREREQUISITES
- User with sudo permission
- CentOS 7 server instance with at least 2 GB RAM
- SonarQube is to be installed
SYSTEM UPDATE
Before installing any packages in CentOS, it is recommended to update the system by running the following commands
- sudo yum -y install epel-release
- sudo yum -y update
- sudo shutdown -r now
Note: Visit this link and get the latest version of SonarQube-Scanner https://sonarsource.bintray.com/Distribution/sonar-scanner-cli/
INSTALLATION
Download the latest version of SonarQube Scanner
sudo wget https://sonarsource.bintray.com/Distribution/sonar-scanner-cli/sonar-scanner-cli-3.0.3.778.zip
Unzip SonarQube Scanner downloaded source
sudo unzip sonar-scanner-cli-3.0.3.778.zip
Change the SonarQube Scanner folder
sudo mv sonar-scanner-cli-3.0.3.778 /opt/sonar/
Open SonarQube Scanner configuration file
cd /opt/sonar/ sonar-scanner-cli-3.0.3.778/conf
sudo nano sonar-runner.properties
Modify the configuration file for SonarQube Scanner
#sonar.host.url=http://localhost:9000
Add SonarQube Scanner path to your /etc/environment file. Open that file in text editor
sudo nano /etc/environment
Add your SonarQube Scanner bin path to /etc/environment, save it and close the editor
PATH=/opt/sonar/ sonar-scanner-3.0.3.778/bin
Verify the SonarQube Scanner by typing
sonar-scanner
If the output is giving like this means -> sonar-scanner: command not found..., check your environment variable
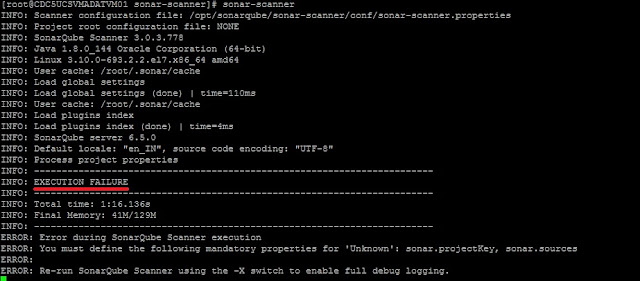
After giving the sonar-scanner command, it lists something like this but it also displays “EXECUTION FAILURE” at the command prompt. Do you know why it is?
Because we didn’t mention which code we have to analyse, that's why it is showing as "execution failure”
So In order to analyse the code, first we have to create the sonar-project.properties in the root of the project folder
The sonar-project.properties will look like
# must be unique in a given SonarQube instance
sonar.projectKey=Project:MyProject
# this is the name and version displayed in the SonarQube UI. Was mandatory prior to SonarQube 6.1.
sonar.projectName=SampleProject
sonar.projectVersion=1.0
#Checking the JS and JSX file
sonar.javascript.file.suffixes=.js,.jsx
#which folder you may want to check
sonar.sources=server, client
# Encoding of the source code. Default is default system encoding
sonar.sourceEncoding=UTF-8
Based on the project type, modify the sonar-project.properties file
After modifying your sonar-project.properties file, go to your root folder (where the sonar-project.properties is also there) and execute the sonar-scanner command
It will show as "execution success"
Reference: https://docs.sonarqube.org/display/SCAN/Analyzing+with+SonarQube+Scanner


Install SonarQube Scanner on CentOS 7 by updating your system, downloading, and configuring the scanner. Follow a NAPS2 quick guide to set up the sonar-project.properties file for successful project analysis.
ReplyDelete